January 31, 2010

10 Minute Cupcakes


I don't lie.  These cupcakes really do take 10 minutes to whip up, then a couple minutes more to get them baked.  Mum made these cupcakes with an orange flavour super fast for afternoon tea and I snapped some photos.

Recipe Source: How to be a Domestic Goddess by Nigella Lawson
Ingredients


125g butter/margarine
125g caster sugar
2 large eggs
125g self-raising flour
1/2 teaspoon vanilla esscence
2 - 3 tbsp milk

Method
1. Preheat oven to 200 degrees Celsius.

2. Add all the ingredients except the milk into a food processor.  Whizz until smooth.


3. Pulse while adding milk down the funnel to make the batter a soft, dropping consistency.  Instead of milk, Mum used a whole orange.


4. Line a muffin tin with patty pans and spoon the mixture into them.  Try to make sure there is an even amount of batter in each little cupcake.  We made some mini bite sized ones and some bigger ones.


5. Bake in the oven for 15 - 20 minutes, or until golden and the cupcakes spring back when touched.


6. When cool enough to touch without really hurting yourself, remove the cupcakes from the tin and place on a cooling rack.

7. For non orange cupcakes, top them with royal icing or buttercream.  We ate our orange cupcakes plain or with a bit of whipped cream.


Our cupcakes were light, fluffy and sponge-cake like.  They were also delicious and really hit the spot after our swim.


Tips and Suggestions
 - If, like us, you want to chuck an orange in then you might want to use some extra flour to make the cupcake more dense.

January 26, 2010

Hello Kitty Cupcakes


It was my little cousin's birthday recently, and she really likes Hello Kitty.  Her parents were making her a Hello Kitty cake, so Mum and I did a bit of research and decided to create Hello Kitty Cupcakes.  For those of you who don't know Kitty (God forbid) here is the real deal.  That's just her face.  She does have a body.

Now, on to the cake.  I used a cream cheese pound cake recipe found on Bakerella's blog for the cupcake, with royal icing, fondant and edible ink marker for her face.

Recipe Source: bakerella, Australian Women's Weekly
Ingredients
Pound Cake
115g butter/margarine
115g cream cheese
270g sugar
3 eggs
100mL milk
210g flour
1/2 tsp baking powder
Royal Icing
1 egg white
2 tsp lemon juice
Icing sugar
Decoration
Fondant
Edible ink marker
Pink food colouring

Method - the Cupcake
1. Preheat oven to 160 degrees Celsius.

2. Cream butter, cream cheese and sugar using electric mixer for about 6 minutes.


3. Beat in eggs one at a time.

4. Add vanilla and milk, beat until combined.

5. Add flour and mix in until combined.  This cake batter is scrumptious, and you can barely taste the cream cheese!


6. Prepare a cupcake pan (or two) with paper patty pans.

7. Using a spoon and spatula, fill the patty pans 1/2 to 3/4 full with the cake batter.  Smooth the tops down with the spatula and make sure the amount of batter in each patty pan is about even.


8. Bake in the oven for about 30 minutes, or until well risen and slightly browned.


I could just eat them.  But I didn't.  Don't be worried if they seem too rounded, they sink a little and become more or less flat.

Method - Royal Icing and Decoration
1. Separate the egg yolk from the egg white.

2. Using a whisk, beat the egg white until foamy - not peaks.  Just foamy.  Add the lemon juice and beat that in.


3. Add some icing sugar (go about 1/2 a cup each time) and mix it in.  Depending on how runny you want your icing, add the icing sugar to your tastes.


For these cupcakes, I made the icing sugar stiffer but still runny.  Test the icing by picking some up with the whisk and dribbling it back into the bowl - for Hello Kitty, make sure that the dribbled icing 'melts' back into the icing in the bowl.  This will mean that Hello Kitty's face will be flat.


4. Set the icing bowl aside and sprinkle your clean workspace with pure icing sugar.  This is so the fondant doesn't stick to the table.  Sprinkle the fondant with icing sugar and knead until it is workable.  With a rolling pin, roll the fondant out to about 1 - 2mm thick.


5. Use a cutter like the one shown below, a triangle or a knife to cut out Hello Kitty's ears.  After cutting out the shapes with the cutter, I chopped off the points with a knife for her ears.  Save the offcuts - you'll need them.


6. Using the ear offcuts and more fondant if needed, add pink food colouring and knead until the fondant is a solid pink with no streaky bits.  Using a small heart cookie cutter, or a knife, cut out two hearts for each Hello Kitty cupcake.  These hearts are for the bow.
When you're done, pair up the hearts and stick the pointy bits together.  Use some water if needed.  Don't worry about squishing them too much, you won't see them under the bow 'knot'.

7. Using a spoon and spatula, drop some royal icing onto the cupcakes.  Make sure you don't put too much on, as they'll overflow, but make sure there's a generous covering.
While the icing is wet, stick the ears on and then the bow over the base of one ear; like so:


Leave them to dry.

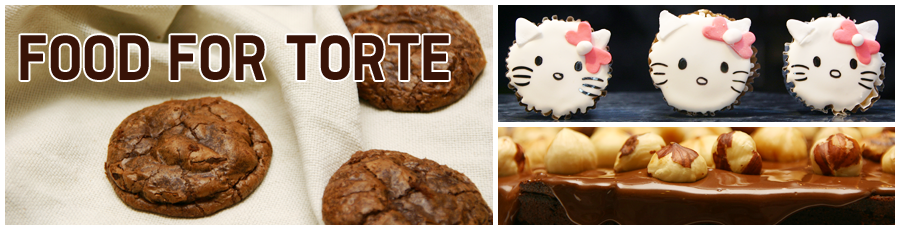
8. When the icing is completely hard, use an edible ink marker (or, alternatively, royal icing tinted black) to draw on Hello Kitty's eyes, nose and whiskers.  Look at a picture of her face on the internet first, model one cupcake on that then copy the design onto the other cupcakes.

Put some of the royal icing into a ziploc bag, and cut a small hole in one corner.  Push the icing to that corner so it can squeeze out the hole.  Squeeze small amounts of icing onto the join between the two hearts of Hello Kitty's bow.


9. Admire their cuteness and simplicity of design.  As Mum says, "Kitty is designed with the 'decoratively challenged' in mind."


Tips and Suggestions
 - Make sure Kitty's bow isn't too far down her face/too slanted.  If it is, then you have to make her eyes closer together which squishes her face up a bit.  (e.g. the cupcake on the far right in the above picture).

As I said before, my Auntie and Uncle made a big Kitty cake.  They used a buttermilk butter cake recipe with buttercream icing.  Her bow had strawberry essence in the icing so it was lovely and fruity.  They did an amazing job!


Lookit!  It's Hello Kitty and all her little minions!


Yummy Kitty.  Yummy minions.


January 22, 2010

Choc Chip Cookies


I think that choc chip cookies have got to be one of my favourite ever recipes.  They are easy to make, the dough is the best, and when baked they taste amazing.


Recipe Source: Chocolate, the Consuming Passion by Sandra Boynton
Ingredients
125g butter
230g brown sugar
1 egg
1 tsp vanilla essence
280g flour
3/4 tsp bicarb soda
220g (or more) dark chocolate chips


Method
1. Preheat oven to 180 degrees Celsius.


2. Cream butter and brown sugar until light and fluffy.


3. Beat in egg and vanilla.  When making more than one batch, beat in each egg one at a time.


4. Fold in the flour and bicarb soda.  The dough has enough flour in it when you can pick it up and roll it in your hands without it sticking all over you.


Take a minute (or two, or ten) to sample the dough.  As I said, this dough is the best I've ever tasted, and I can't get enough of it!  I find it's better to eat before you put the choc chips in, so you don't have to pick bits of chocolate out of the dough (they ruin the doughy experience.  I know, it's chocolate, but this dough is good.)


5. Fold in chocolate chips.


6. Use a tablespoon (for larger cookies) or teaspoon (for small cookies) to drop cookie dough onto a sheet of baking paper or a baking sheet.  Roll the cookies in your hands to form them into balls, then place them evenly on your baking sheet.  Use the palm of your hand to flatten the biscuits a bit (I don't go fancy and use the bottom of a glass or anything).  


Make sure there's a space between the biscuits - they don't spread much, but don't let them be too crowded!


7. Bake in the preheated oven for about 10 - 15 minutes, or until the cookies are brown all over.


8. Transfer the baked cookies to a cooling tray.


Yuuuuum.  They are beautiful when they're all warm and the chocolate is melty after they've just come out of the oven.


Tips and Suggestions
 - Make teaspoon-sized cookies for small cookies that can be easily snacked upon.
 - Bigger sized cookies wrapped in cellophane and ribbon are great gifts!
 - Store in a box/jar/tin at room temperature, no need to refrigerate.

January 15, 2010

Lemon Meringue Pie for a special birthday

It was my Auntie's birthday on the 12th, and I asked her what birthday cake she wanted for the big family dinner.  She said she'd like Lemon Meringue Pie, or something else citrussy.

Lemon Meringue Pie?  I can do that.


Thank you to my little cousin (my Auntie's daughter) who helped me mix things and posed beautifully while I snapped photos, and to Mum who made the meringue topping.  You were both great helps!

Recipe Source: Stephanie Alexander's The Cook's Companion (pastry and filling), The Australian Women's Weekly Children's Birthday Cake Book (meringue icing)
Shortcrust Pastry
This pastry is fantastic - it has a nice texture, crunch and can be used for sweet or savoury dishes.

Pastry Ingredients
180g unsalted butter/margarine
240g plain flour
Pinch of salt (if using unsalted butter/margarine)
1/4 cup water

Pastry Method
There are more difficult ways to do this, but this is how I do it and it's dead easy.
1. Chop the butter or margarine into squares and put them into a food processor along with the flour and salt.


Whizz the food processor round until the mixture looks a bit like breadcrumbs:


2. Pour in the water...


And keep whizzing until the dough looks like this:


3. Package up the dough in clingwrap and leave it in the fridge for about half an hour.  Longer, and if you're using butter it'll go really hard.  (I did this.  I know.)


Filling
A delicious, soft, lemon filling.  Not too tart, not too sweet.

Filling Ingredients


6 eggs
250g caster sugar
3 large lemons - zested and juiced (I used my Great-Grandma's home grown lemons; they're fantastic!)
200mL cream

Blind Baking
(If you're comfortable making the filling, then put the pastry in the oven to blind bake it first and make the filling while the pastry bakes.  If you are less confident, make the filling first and then blind bake the pastry).

1. Preheat the oven to 200 degrees Celsius.

2. Roll out the pastry dough between two sheets of baking paper to about 1/2cm thickness.

3. Line the bottom of a 20cm diameter springform tin with baking paper; no need to butter the edges, the pastry is full of butter so will just lift of the sides.

4. Lay the pastry into the tin, try to smooth out the sides so there are no huge creases.  Don't bother about trimming the edges much - you can do that later.  Leave some pastry hanging over the edge of the tin, because the pastry shrinks when baked.  My pastry shrunk.  It happens.

5. Lay some baking paper over the pastry and fill with kidney beans, chickpeas or rice.  (Or something else - you just need something to weigh down the pastry that won't burn in the oven.  If the pastry isn't weighed down, it may become all misshapen.  This is called loading.
Mum asked if unpopped popcorn would be OK.  No, Mum, popcorn is not OK.  I'd rather not clean up popped popcorn from all over the oven).

6. Put the pastry into the oven and bake for 20 minutes.  Remove it after the 20 mins. and reset the oven to 160 degrees Celsius.

Filling Method
1. Combine eggs and sugar in a bowl with a whisk.


2. Zest the lemons.  To zest, scrub the lemons' skin so they're free of dirt.  Then grate the lemons' outsides until you can just see the white pith all over.  Try not to get too much of the pith in your zest.  Tip the zest into the egg and sugar mix.


3. Cut the zested lemons in half and juice them into a new bowl.  I juiced them with a handheld juicer.  Get a strainer, hold it over the bowl with the egg, sugar and zest mixture, and tip the juice into it.  This is to strain out the giant bits of pith, innards and pips.  Whisk until combined.

4. Measure out the cream, add it to the filling mixture and whisk until combined.  Your mixture should look like this:


5. Pour the filling mixture into the blind baked pastry.  (First remove the loading, of course).


6. Put the pie in the oven at 160 degrees Celsius and bake for 35 - 45 minutes until set.  However when the tin is jiggled gently, the filling should still wobble.  Leave it to cool in the tin.  If you want, you can trim the mangy bits off - I didn't; I think it gives a nice rustic feel.


Meringue Icing
This isn't really meringue, it's called 'fluffy frosting' in the Women's Weekly book.  To me, it's a thick meringue that you don't have to bake.  The egg white is cooked by the hot sugar syrup when it's added.

Meringue Ingredients
1 1/4 cups sugar
1/2 cup water
3 egg whites

Meringue Method

1. Combine sugar and water in a small saucepan, stirring over medium head until sugar is dissolved; do not boil.


2. Increase heat and boil rapidly uncovered for 3 - 5 minutes; do not stir after syrup boils.  The syrup should reach 115 degrees Celsius.  Mum and I were glad to use our new candy thermometer!
If you don't have a candy thermometer, after the syrup has boiled for a while take it off the heat and wait for the bubbles to subside.  Then drop 1 teaspoon into cold water.  It should form a ball of soft, sticky toffee when rolled between your fingers.


The syrup shouldn't change colour - if it does, it's been cooked for too long!


3. Separate the egg whites from the egg yolks.  Beat eggs whites in an electric mixer until stiff.  Then pour the sugar syrup into the egg whites with the mixer on medium speed.  Make sure you pour the syrup slowly and in a steady stream.
This will take a while.


4. Turn off the mixer.  The meringue should be very thick and very stiff.


Assembly
1. Make sure the lemon filling is cooled.


2. If it is, lump the meringue onto the pie and spread around.  Traditionally, the meringue has a lot of peaks on it.


3. If you've got a flame-thingy, you can use it to brown the tips of the meringue.  Unfortunately, I don't have one...so my meringue stayed white as white.


Yum.


And closer...


4. Serve the Lemon Meringue Pie just by itself or with heavy cream.  It's beautiful with tea as well!


Tips and Suggestions
 - Mum and I put a lot of meringue on the pie.  The meringue was really really sweet.  I recommend that you don't use as much sugar syrup in the meringue, and perhaps don't put all the meringue on the pie.
 - Be very careful when cutting the pie, as some pieces collapsed and fell apart a bit.  This is because we cut it when it was still warm.  It'll solidify a bit it it is cooled, so make sure that it's cold before you cut.  Putting it in the fridge helps.


Enjoy!